My bloat wars with Windows Update.
There’s a peculiar frustration that comes with being a Windows Insider Preview participant. You sign up with the best intentions, excited to test cutting-edge features and contribute to Microsoft’s development process. Then reality sets in. Your computer starts downloading updates you never requested, updates that consume precious storage space, updates that simply won’t stop coming. Even when you disable automatic updates, thinking you’ve finally won the battle, Windows gives you only a temporary reprieve of one week before the cycle begins again.
This morning, I discovered something that changed everything. After weeks of watching my available storage shrink and feeling increasingly powerless against the relentless tide of updates, I found a solution that freed up 4GB of space on my machine. The answer wasn’t hiding in some obscure third-party application or requiring a complete system reinstall. It was right there in the Command Prompt, waiting for someone desperate enough to go looking.
The Problem That Keeps Growing
Let me paint you a picture of what led me here. As a Windows Insider, my computer receives a constant stream of preview builds and updates. Microsoft, in their wisdom, has designed the system to be persistent about these installations. You might think that toggling off automatic updates in your settings would solve the problem, but you’d be mistaken. The system allows you to pause updates for exactly seven days, after which it cheerfully resumes downloading and installing whatever Microsoft decides you need.
The real frustration came when I tried to investigate where all my storage space had gone. I opened File Explorer, searched through my folders, looked in all the obvious places where large files might accumulate. Nothing stood out. The Settings app has an update history section, but try as I might, I couldn’t find any option to delete these accumulated updates. This seemed deliberate, a design choice that keeps users from managing their own systems.
That’s when I remembered the oldest and most reliable tool in any Windows power user’s arsenal: the Command Prompt. If the graphical interface won’t let you do something, the command line often will.
Understanding What’s Actually Happening
Before we dive into the solution, it helps to understand what Windows is doing behind the scenes. When your computer downloads updates, it doesn’t just grab a small file and install it immediately. The operating system creates an entire cache of downloaded update packages, installation files, and historical data in a folder called SoftwareDistribution. Think of this folder as a warehouse where Windows stores everything related to updates, both current and past.
Over time, especially for Insider Preview participants who receive frequent updates, this warehouse becomes cluttered with files that serve no practical purpose anymore. Completed updates leave behind their installation packages. Failed updates leave behind partial downloads. The system keeps historical records of everything it’s done. All of this sits on your hard drive, consuming space that could be used for your actual files and programs.
The beauty of what I discovered is that you can safely clear out this warehouse without harming your system. Windows doesn’t need these old files to function properly. It’s like cleaning out a storage unit filled with boxes from moves you made years ago. The memories might be there, but you don’t need to keep the boxes.
The Solution: Step by Step
Here’s how I reclaimed my storage space, explained in a way that shows not just what to do, but why each step matters.
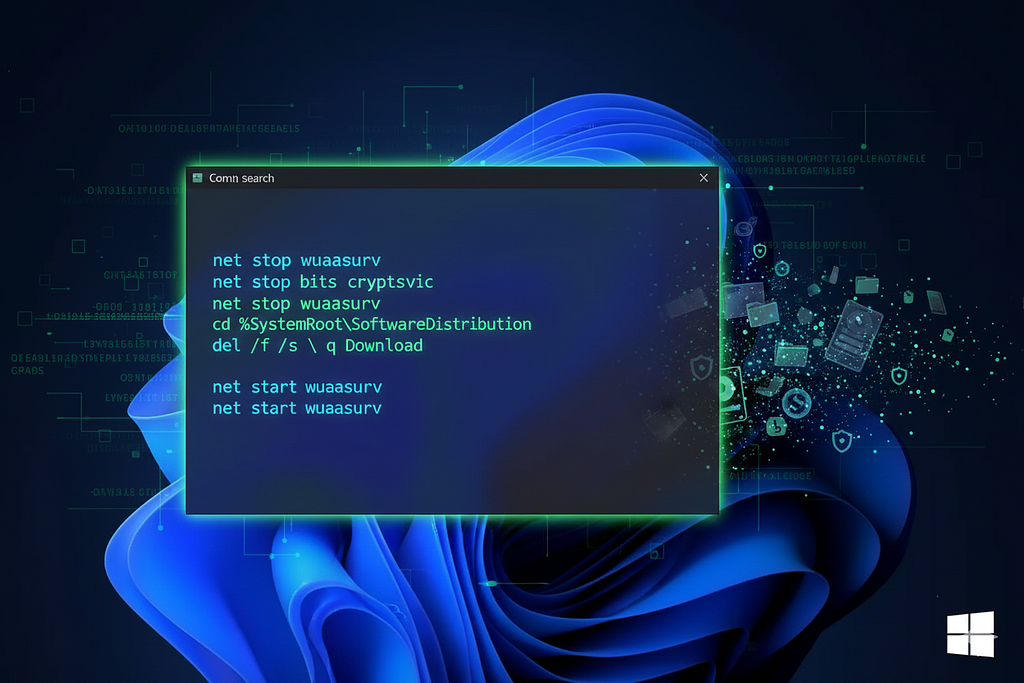
The first thing you need to do is open Command Prompt with administrative privileges. This is crucial because the folders and services we’ll be working with are protected system components. Press the Windows key on your keyboard and type “cmd” into the search box. When Command Prompt appears in the results, don’t just click it. Right-click on it instead and select “Run as administrator.” Windows will ask you to confirm that you want to allow this program to make changes to your device. Click yes. This elevated access gives you the permission needed to modify system files and control Windows services.
Now comes the interesting part. Windows Update isn’t just one program running in isolation. It’s actually a collection of services working together. Three services in particular handle the downloading, installing, and cataloging of updates. Before you can safely delete any update files, you need to stop these services. It’s like pausing a machine before you open it up to clean the parts inside.
Type the following command and press Enter:
net stop wuauserv
This command stops the Windows Update service itself, the primary component responsible for checking for and installing updates. You’ll see a message telling you the service was stopped successfully. Now type this command and press Enter:
net stop bits
BITS stands for Background Intelligent Transfer Service, and it’s the component that actually downloads update files in the background while you’re working on other things. Finally, type this command and press Enter:
net stop cryptsvc
The Cryptographic Services component validates and catalogs the updates to ensure they’re legitimate and haven’t been tampered with. With all three services stopped, you’ve essentially put Windows Update into a safe, dormant state.
Now you’re ready to navigate to where all those update files are hiding. Type this command:
cd %SystemRoot%\SoftwareDistribution
This command changes your current directory to the SoftwareDistribution folder. The %SystemRoot% part is a variable that automatically points to wherever Windows is installed on your system, typically C:\Windows. You’re now standing at the doorway of that cluttered warehouse I mentioned earlier.
At this point, you have two options depending on how thorough you want to be. If you want to delete just the downloaded update files while preserving some of the update history and metadata, type this command:
del /f /s /q Download
This command deletes everything in the Download subfolder. The flags tell Windows to force deletion of read-only files, search through all subdirectories, and operate in quiet mode without asking for confirmation on every file. If you want to go further and clear out the entire update cache and history, use this command instead:
del /f /s /q *.*
This removes everything in the Software Distribution folder. Note that I’m not telling you to delete the folder itself, just its contents. The folder needs to remain because Windows Update will recreate the necessary structure when it starts up again.
After the deletion completes, you need to restart those three services you stopped earlier. Type these commands, pressing Enter after each one:
net start wuauserv
net start bits
net start cryptsvc
You’re essentially turning the machine back on after cleaning it. Windows Update will now start fresh, recreating only the files it needs for future operations. Close the Command Prompt window and restart your computer to ensure everything initializes properly.
The Results and What I Learned
When I followed these steps this morning, I watched as Windows deleted thousands of files from the Software Distribution folder. The entire process took less than five minutes, and when it finished, I had reclaimed 4GB of storage space. That might not sound like much if you have a spacious hard drive, but on a laptop with limited SSD capacity, it made a real difference.
More importantly, I learned something valuable about Windows and about computing in general. The graphical interfaces we use every day are designed to be user-friendly, but they’re also designed to prevent users from doing things Microsoft has decided they shouldn’t do. Sometimes those decisions make sense for security or stability reasons. Other times, they’re just frustrating limitations that prevent you from managing your own computer.
The Command Prompt, that black window with white text that intimidates so many users, is really just a more honest interface to your operating system. It doesn’t hide options or make decisions for you. It simply does what you tell it to do, assuming you have the proper permissions. Learning to use it, even just for simple tasks like this one, gives you back a degree of control over your machine.
If you’re a Windows Insider like me, or if you’re just tired of watching Windows Update consume your storage space without your consent, I encourage you to try this process. Be careful, follow the steps exactly as written, and don’t delete anything beyond what I’ve described here. But don’t be afraid of the Command Prompt either. It’s been part of Windows since the very beginning, and it’s one of the most powerful tools you have for maintaining your system.
Your computer should work for you, not against you. Sometimes you just need to know where to look to make that happen.
Have you dealt with Windows Update frustrations? Found your own solutions to reclaim storage space? I’d love to hear about your experiences in the comments.